

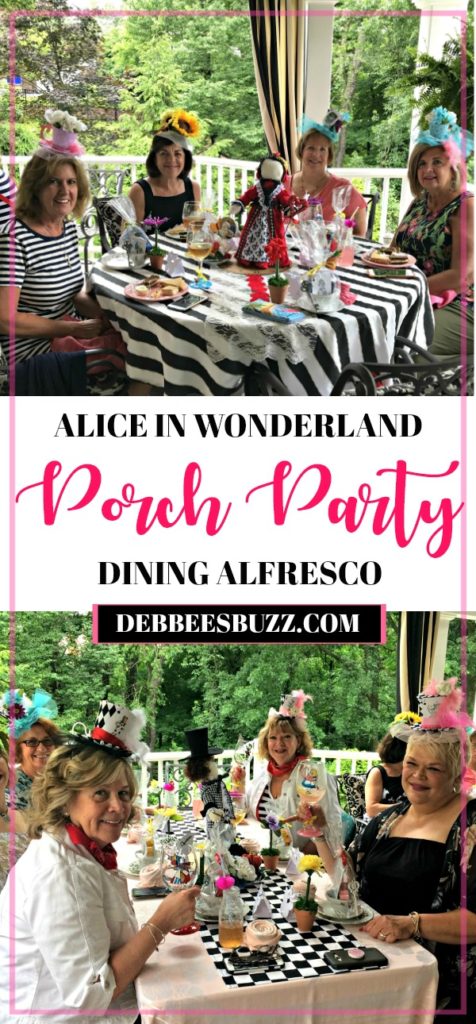
As part of the June Pinterest Challenge Blog Hop, I am excited to show you the teacup fascinators I made as favors for the Alice in Wonderland, Unbirthday Party.
The theme event was the 4th annual My Favorite Things Party I’ve hosted.
I made a total of 18 fascinators in three different designs (teacup, mini Mad Hatter and floral) — in a variety of colors. They were the primary favor for guests.
First-come, first-pick in the Mad Hatter’s trunk show!
The purpose of the Pinterest Challenge is to motivate all to not just pin, but act on it! You’ll want to read until the end for links to lots of fun projects, recipes and posts by other bloggers. The monthly blog hop is hosted by Erlene of My Pinterventures.
Learn what inspired the teacup fascinators, see examples of the ones I made, and learn how to make one (or more!) yourself.
I use affiliate links. If you make a purchase, I may earn a small commission that helps to offset website operating costs with no additional cost to you. Your support is appreciated! Disclosure Policy.
Pinterest Inspiration

When I decided to create teacup fascinators for my guests, I went exploring on Pinterest for inspiration and ideas. I found a number of cute pins ranging from simple to elaborate designs and materials.
My favorites were by from Vanessa the Strange of Japan. The “Did Someone Say TEA?” post was published February, 2010 on the Cut Out + Keep website. But, when I went to see if there was a pattern or tutorial, I read this:
“Have since removed my template from here because people were using it to make and sell these as their own design even after I posted a request not to do so. I do not own the idea of the tea cup hat and was not the first one to make them, but the template was mine and I lent it to those who wanted to make one for their own personal use. Would still love to see everyone else’s version of a tea cup hat though… just make it your own :). Thank you.”
Next, I found an Etsy pdf pattern with accompanying tutorial for $8 by Fiona at Royal House of Whimsy. Seems a reasonable price to pay. You can also purchase a teacup fascinator in different colors. But, I decided to first see if I could come up with my own design and technique, as encourage by Vanessa.
My Cup of Tea
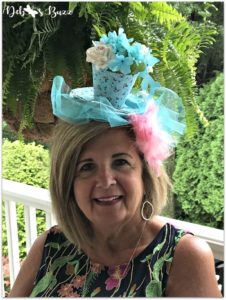
Before I show you how I made the teacup fascinators, let me show you the finished product.

The first one I made was Tiffany blueish, and I made a pair.

The blue teacup fascinators were my “proof of concept,” to test the design and pattern I came up with.

Believe it or not, even though the party was just ten days ago, I made these first two teacup fascinators last August! I usually pick the My Favorite Things Party theme a year in advance, to allow me plenty of time to plan, shop and craft.
When designing the teacup fascinators, I wanted them to look good from the front, back and sides. Basically, all the way around! Here’s the back view:

How to Make Your Own Teacup Fascinators
Whether you want to make teacup fascinators as party favors, as a costume hat, or for a child or adult tea party, there are lots of methods to choose from. What follows, is a step-by-step tutorial of how I did it.
Materials
As you can see below, many of the materials came from Dollar Tree and were used for multiple teacup fascinators.
- Clear 5 3/4 plastic plate: Dollar Tree (8 for $1)

- Clear 9 oz. plastic tumbler: Dollar Tree (10 for $1)
- Fabric (about 18″ x 15″)
- Netting (scrap)
- Foam or stiff felt (scrap)
- Headband: Dollar Tree (3 fabric-covered or 5 plastic for $1)
- Piece of rick-rack (about 9″ length)
- Feather boa (cut about 6-9″ section): Dollar Tree
- Cardstock sheet (scrap piece)
- Floral foam (scrap piece)
- Assorted silk florals
- Silver plastic mini spoons: Dollar Tree (24 for $1)
- Mini rose: Michael’s or other craft store
- Mini glue sticks (probably 2/per hat)
Many supplies like the netting, card stock, floral foam, silk florals and mini roses were mostly from my craft stash of leftovers from other projects.

When all was said and done (including if I had purchased the leftover craft materials — particularly the florals), I probably spent about $5 per teacup fascinator.
Infrastructure
The finished hat had to be lightweight to wear on the head and balance in place. Here you can see a number of the ladies comfortably moving around the beverage stations in their teacup fascinators.

Most fascinator tutorials for teacups and mini Mad Hatter style hats call for using a cardboard, cardstock or stiff foam base. I used a clear plastic tumbler for the teacup and a plastic dessert plate for the saucer.

Each was covered in fabric using a cool temperature glue gun (recommended for use with fabric, paper, etc.).
Fabric-Covered Saucer
The fabric I used for the teacup fascinators were all very small prints — to resemble a floral pattern you might see on real china. It was not easy to find tiny prints! The blue pattern came from Joann’s quilting section. Pink with little butterflies and the purple fabric were found at Pat Catan’s.
Next, I cut out a large circle of fabric to cover the plastic plate and create the teacup saucer. Using a round tray as a template, I simply traced in pencil onto the fabric, and then cut out the circle.

The size was bigger than needed, but worked. You could definitely make a smaller circle to save on fabric. After that, place the fabric right side down, with the plastic plate centered on top. The plate should also be right side down.

Using a glue gun, attach the fabric to the plastic plate.

“Pleat” the fabric as you work around, so that it lays flat on the reverse side.
Attaching the Headband
To attach the headband to the saucer, I cut a roughly egg-shaped piece from either a sheet of foam or stiff felt sheets (Joann’s). Using an Exacto-knife, I cut two small slits.
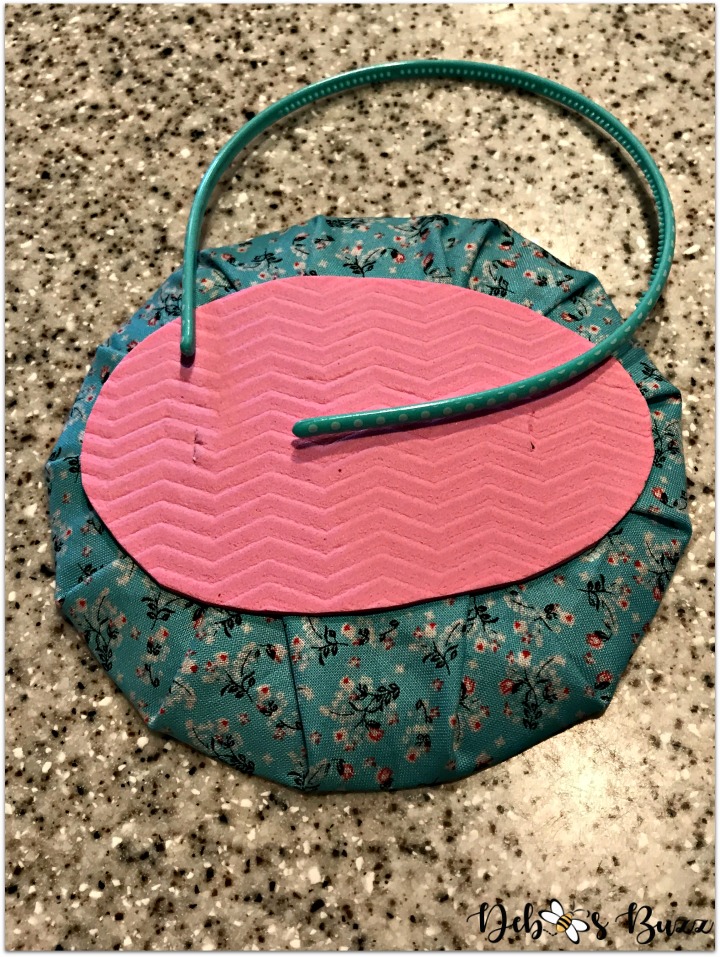
Next, the foam was hot-glued to the bottom of the saucer. Eventually, the headband was slipped through the two slots.

Now, flip the completed saucer over for attaching the teacup.
Embellish Underside of Saucer
This part you will have to play around with, as I did. First cut a roughly 12″ circle of netting. Then “gather” or pleat as you hot-glue it to the underside of saucer. Be careful not to cover the center foam egg slits. Attach the netting in what would be the front, or forehead part of the face.
More netting was added to create a poof, in what would be the back of the teacup fascinators.

For an additional flourish, I cut a section of white or pink boa to add feathers to one side of the saucer. Other times, I added odds and end pieces of ribbon and/or lace to trail down the back of the head.

Fabric-Covered Teacup
I didn’t take any pictures of covering the plastic tumbler with fabric. Or, if I did I can’t find them — sorry! Let me explain the process.
- Create a fabric pattern piece by rolling the cup one full rotation on paper; tracing as you go. Then add another 1/3″ or so margin along the top, bottom and one of the two ends.
- Trace the bottom of the cup for the second pattern piece.
- Cut out both patterns in fabric.
- Hot glue the fabric along the outside of the plastic cup, overlapping slightly.
- Turn the excess fabric at the top edge inside the cup and glue in place.
- Being careful to center the cup, glue the cup to the saucer, applying downward pressure.
- Optional: glue a piece of rick-rack around the base of the cup where it is attached to the saucer.
My Cup Runneth Over
You could just take the little circle of fabric, glue it inside the bottom of the teacup, thread the headband through the slits and be finished. But, I filled my teacup fascinators with silk flowers.
I was able to economize by using flowers I had leftover from other projects. Although, I did pick up a few more to fill-in from Michael’s and Dollar Tree.
First, cut a piece of a floral foam brick to fit into the cup, about 2″ thick. Then, glue it inside the teacup.

Next, cut slits in the little circle of matching fabric, to put the stems of the flowers through. The fabric circle helps give the inside of the teacup a finished look. Many ladies wore the teacup fascinators at an angle, and I didn’t want people see some ugly green foam and plastic floral stems.
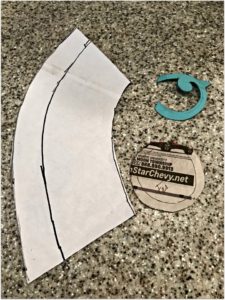
Adding a Handle & Spoon
After some trial and error, I hand drew a template for a teacup handle. It was then traced onto and cutout of cardstock. At each end, where the handle was attached to the side of the teacup, I left margin. Fold at the margin, and glue the handle in place.
If anyone has an idea on how to created a more stiff, but lightweight handle, please let me know.

Little silver spoons, embellished with a little rose in the bowl, were simply hot-glued onto the top of the saucer. Apply a little pressure until secure.
Headbands Easy to Maneuver
Lastly, thread the headbands through the two slits in the foam underside of the teacup fascinators. To adjust for comfort and balance, the ladies could just slide the headband one way or the other.

I also provided bobby pins in the Mad Hatter’s Fascinator Shop. No one complained about the headbands being too tight, something I was a bit nervous about.
Labors of Love
I estimate I spent 3 1/2 hours on each teacup fascinator. Multiple that by 18! That doesn’t count shopping for supplies. I told you I had gone a little bonkers!
No one is going to get rich making these to sell for a profit! They are just too time-intensive to cover the cost of labor. Still, it was very rewarding and satisfying to see how much the ladies loved their hats.

There are a lot of similarities in making the teacup fascinators and the mini Mad Hatters.

Now let’s see what other things Pinterest inspired! Head over and visit the other hosts to see what they crafted, cooked, built, or tried!
—
See more Alice in Wonderland party posts on invitations, decorations, favors, games, tablescapes, and food.
Related Post Picks
Pin Me!

This post was featured on:

regularly participate in: Metamorphosis Mondays, Tutorials & Tips, All About Home, Lou Lou Girls Fabulous Party, Celebrate Your Story, Beautifully Made, Turn Around Tuesday, Party in Your PJs, Share Your Style, Vintage Charm, Charming Homes & Gardens, Tablescape Thursdays, Thursday Favorite Things, Creatively Crafty, Saturday Sparks, Snickerdoodle Sundays, Happiness is Homemade, and Love Your Creativity


This looks like it was so much fun to make! I really love the theme of your “unbirthday” party. Your guests look like they were enjoying the day. 🙂
Thanks Kristie, the first 3 were fun… so, I’d take a break for a week or so before making another 3. The theme really was ideal for celebrating a big-0 birthday. I hope you’ll check out the Alice in Wonderland Party Reveal
Oh my goodness; these are so darling! I bet they were a huge hit too. Pinned.
I was so pleased by the reaction. Everyone wore there’s and took them home.
The theme for my quilt guild’s annual luncheon this year is teacup garden party. We are encouraged to decorat and wear hats but since I hate to wear hats, I decided on a fascinator. Took some poetic license and came up with a version that I think will work. Thanks for the directions and pictures — very helpful.
Oh boy Barbara, I love a theme party and your guild’s luncheon sounds wonderful. Would love to see a pix of your fascinator! You can send it to me at buzz@debbeesbuzz.com
Hi! I am making the tea cups fascinators for our church’s Mad Hatters Tea Party missions fundraiser.
I am using Mod Podge to glue the fabric and it is looking great. I’m still in the early construction stages so came looking for ideas, and yours are great!
Using Mod Podge is a great idea — thanks for sharing Connie! Delighted my fascinators provided some inspiration! Best of luck with your fundraiser; I’d love to hear how it goes.
If this isn’t the cutest project ever! Your teacup facinators are beyond adorable! I bet all the ladies had fun wearing them! Pinned!
Why thank you Gail! One thing I plan to do in a few months, is see if any assed their fascinators on to a daughter or granddaughter for their own tea parties.
These hats are so cute & creative! I love them! It looks like everyone had a great time at the party!
Thanks Jenny! You are so crafty, have you ever made a fascinator?
Such a cute and ambitious project. I’m positive the lucky recipients enjoyed wearing these gorgeous creations during your unbirthday party. Thanks for sharing.
Not everyone is a “hat person” like me, but everyone seemed quite excited to choose in the Mad Hatter’s shop. And, no one balked at posing in the photo booth either.
Craft foam for the handle. Imho. I’m going to use glitter craft foam.
Patricia, that’s a great idea — thanks for sharing it! Would love to hear how your fascinator(s) turn out? What are you making it/them for?
Making for a tea party. I present traveling tea parties for clients. Craft foam turned out perfectly. Seeing if I can upload a photo!
That’s great Patricia! Unfortunately, you can’t upload photos to my blog, but you can email a picture at buzz@debbeesbuzz.com
Too cute! What a great idea for a fun project!
Making a few is a fun project and I highly recommend it. But, they are time-consuming! There’s no real way to get any economies of scale. Although, it could be fun to set up a “production line” of a few friends to create a bunch for a fund-raiser or other large event?
Truly a labor of love, good thing you had a year. You are always so creative.
It sure was! Between the fascinators and painting the character glasses along equated to about 3, 40 hour “work” weeks…
A true labor of love, and what a great tutorial, Debbee! They really look fabulous.
Thanks Rita! I’ll bet you come across a lot of fun old hats? I love the ones from the 1950’s and 1960’s like my mother wore. What I wouldn’t have to have just one or two! Now that the Mad Hatter trunk show is over, I’m thinking I may store vintage hats in the hat box. Oh dear, a new collection!
I love that you start early on your party theme! I do the same thing so I have plenty of time to shop sales too. I love these fascinators! I did an Alice tea party for my daughter’s 6th birthday a few years a go and these would have been so fun. I had the girls decorate their own dollar store hat and they felt so fancy! I’d love to have been a guest at this one!!
Bri, did you do a post on the party? I’d love to see it. For young kids I’m sure making their own hats was way more fun than premade ones to wear. I’d have loved to had my followers and fellow bloggers at the party — but I couldn’t have made all those fascinators! If you like the theme, I’ll be posting a lot more photos and details over the summer. Here’s the Alice in Wonderland Party Reveal.
Debbee, OMG, they are so very wonderful!!! I am a huge fan of dress up parties and I’ve made quite a view costumes myself. They will most definitely go on my according Pinterest board.
I’m glad you liked them Habiba! Have you posted about the costumes you’ve made? My mother always made our costumes growing up, and I did the same with my sons for Halloween. In college, I loved dressing up for theme parties! My hubby is not into it. Bee sure to check out upcoming posts on making the other two types of fascinators — floral and mini hatters.
Actually, I have! I’d love to get a feedback from you as you are a kindred dress-up-spirit. http://craftifymylove.com/2017/10/02/easy-no-sew-butterfly-family-costume/ And there will be many more, once I find the time to either sit down and write the tutorials or sit down and craft all the sparkly ideas that are in my head.
I will definitely make sure to check in regularly to see if you have those other great fascinators up.
I love the painted wings and pinned it! If you subscribe, maybe you’ll win a purple teacup fascinator? Keep in touch.
I just loved these and all the time, work, and effort that went into your party. Your friends should consider it an honor to be invited! Look forward to seeing more.
I hope I didn’t bemoan the effort too much! My guests are the best. If you read Alice in Wonderland Party Reveal, you’ll see that they gave a very generous group donation to where I volunteer — in honor of my unbirthday. How great is that?!
I can tell you all had a terrific time. The fascinators are so pretty. You really think of every detail.
Thanks Debra, I know I did! Everyone was such a good sport about wearing their fascinators — most for the entire length of the party. Except for playing House of Cards, when couldn’t risk it falling off LOL!
These are adorable! Looks like a great time was had by all!
Hi Roseann! The unbirthday party will always hold very special memories for me.
Debbee, you out did yourself with this project. I absolutely adore these! Alice in Wonderland is one of my favorite books and I can’t think of a better theme for a tea party. Thank you for this very detailed how-to. Pinning for future parties!
That’s just too cute! I’m not sure I have the patience to make multiples of these but I’d like to make ONE for myself. Thank you for the tutorial.
Joy, I hope you decide to make one. Let me know if you do and share a picture please!
These are darling! You did an amazing job! It looks like the party was a huge success! Thanks for sharing with SYC.
hugs,
Jann
Jann, how could I not share a teacup fascinator with your link party called, Share Your Cup?! Mine sits on top of the head LOL!
I love how you plan and go all out for your parties. It’s even impressive that your girl friends wear the party hats too. Pinned.
Erlene, working on the parties for nearly a year is part of the fun for me — plus the anticipation. Sometimes though, I’m dying to share some of the details ahead of time — my adult sons and husband are only able to muster so much excitement LOL! But, yes, the ladies were more than willing to wear the hats and so excited to choose one from the fascinator shop. They were very lightweight, and bobbie pins helped to secure them in place.
Your parties are the best! I imagine all of your friends leave with smiles and wake up with smiles the next day. You make them feel so special. I love your tutorial, great instructions. I think I can make them too.
I understand why your inspiration blogger took her tutorial down. I am currently doing battle with a similar issue with rogue sites constantly stealing one of my recipes.
Thanks Shirley, I hope the post left you with a smile too! I’m sure you can make one, it’s just a little time-consuming is all. Really sorry to hear about rogue sites stealing your recipe. Hope you win the battle.
super cute wonderful for a tea party!
Thanks Lorin. I think many of the teacup fascinators are going to have repeat appearance at tea parties for my friends’ grandkids.
What a fun idea. I just have to try it to make one. Maybe have a tea party too. Happy Summer, Kippi
Hi Kippi, I hope you do make one! If so, please send me a pix. I’d love to see your interpretation.
Wow Great Tutorial! Love the hats!
Thanks Nancy! Thinking of making one yourself?
Debbie, What a great idea with teacups and yours are really pretty. I know you must have spent lots of time on the design. Love your posts and ideas on different crafts. Keep up the good work. Look forward to your future postings. Lilly
Hi Lilly, hope you’re having a great summer? Nice to hear from you. Guess you missed the fascinator DIY post last summer? I’m a maker and really enjoy crafting, thanks for the encouragement!
OMG That hat is just the cutest. Hope you enjoy your party.
Thanks Anita!
Hi Debbie,
You’re the only one I know that starts a year ahead except for myself. I do a huge garden Party every summer. Next summer is Mad Hatter tea party. I was inspired by your fascinators but shaved off a huge amount of time from the prep work by using flower fronted tea cups and saucers from Amazon. I wanted to insert photos and a link to the paper cups but I don’t see option. They turned out beautifully. I also cut out the foam fabric covering by using the leaf bunched from the bottom of flower stems to give a more natural look. Happy to send photos by email. I made 12 of these in one day with this method
Oooooh, a garden party, sounds wonderful Leanna! Glad my fascinators inspired your own creative approach. Sounds much easier, productive a process for making multiples. Appreciate the insights! Do send me photos to buzz@debbeesbuzz.com, would love to see!
These adorable! I used your suggestions and made one for our Annual Spring Tea at our church. I glued pearls together to make my handle and used the same pearls to outline the cup where it met the saucer to cover any irregularities. Great job!
Beth Ann, thanks for letting me know that you found my DIY helpful! The pearls sound like a wonderful idea. Hope you enjoyed wearing it!